
ChatKit
For the complete documentation index, see llms.txt. Markdown versions of documentation pages are available by appending
.mdto the page URL.
ChatKit is the best way to build agentic chat experiences. Whether you’re building an internal knowledge base assistant, HR onboarding helper, research companion, shopping or scheduling assistant, troubleshooting bot, financial planning advisor, or support agent, ChatKit provides a customizable chat embed to handle all user experience details.
Use ChatKit's embeddable UI widgets, customizable prompts, tool‑invocation support, file attachments, and chain‑of‑thought visualizations to build agents without reinventing the chat UI.
Overview
Choose between two ChatKit paths:
- Custom server integration. Run ChatKit on your own infrastructure. Use the ChatKit Python SDK and connect to any agentic service, including one built with the Agents SDK. Use widgets to build the frontend.
- Existing Agent Builder-hosted integration. If you already use ChatKit with an Agent Builder workflow, you can keep using that hosted workflow during the Agent Builder transition window.
OpenAI is deprecating Agent Builder. Existing users can continue using it during the transition window, and the product is scheduled to shut down on November 30, 2026. ChatKit is still available. For new work or migration planning, use advanced ChatKit integrations with your own server-side agent implementation, and see Migrate from Agent Builder for Agent Builder transition guidance.
Get started with ChatKit
- Custom server integration: Use any server and the ChatKit SDKs to build your own custom ChatKit user experience
- Existing hosted workflow: Connect ChatKit to an existing Agent Builder workflow during the transition window
Embed ChatKit in your frontend
Use this path only if you already have an Agent Builder workflow that backs your ChatKit implementation. For new ChatKit apps, or when migrating before Agent Builder shuts down, use the advanced integration to connect ChatKit to your own server-side agent implementation.
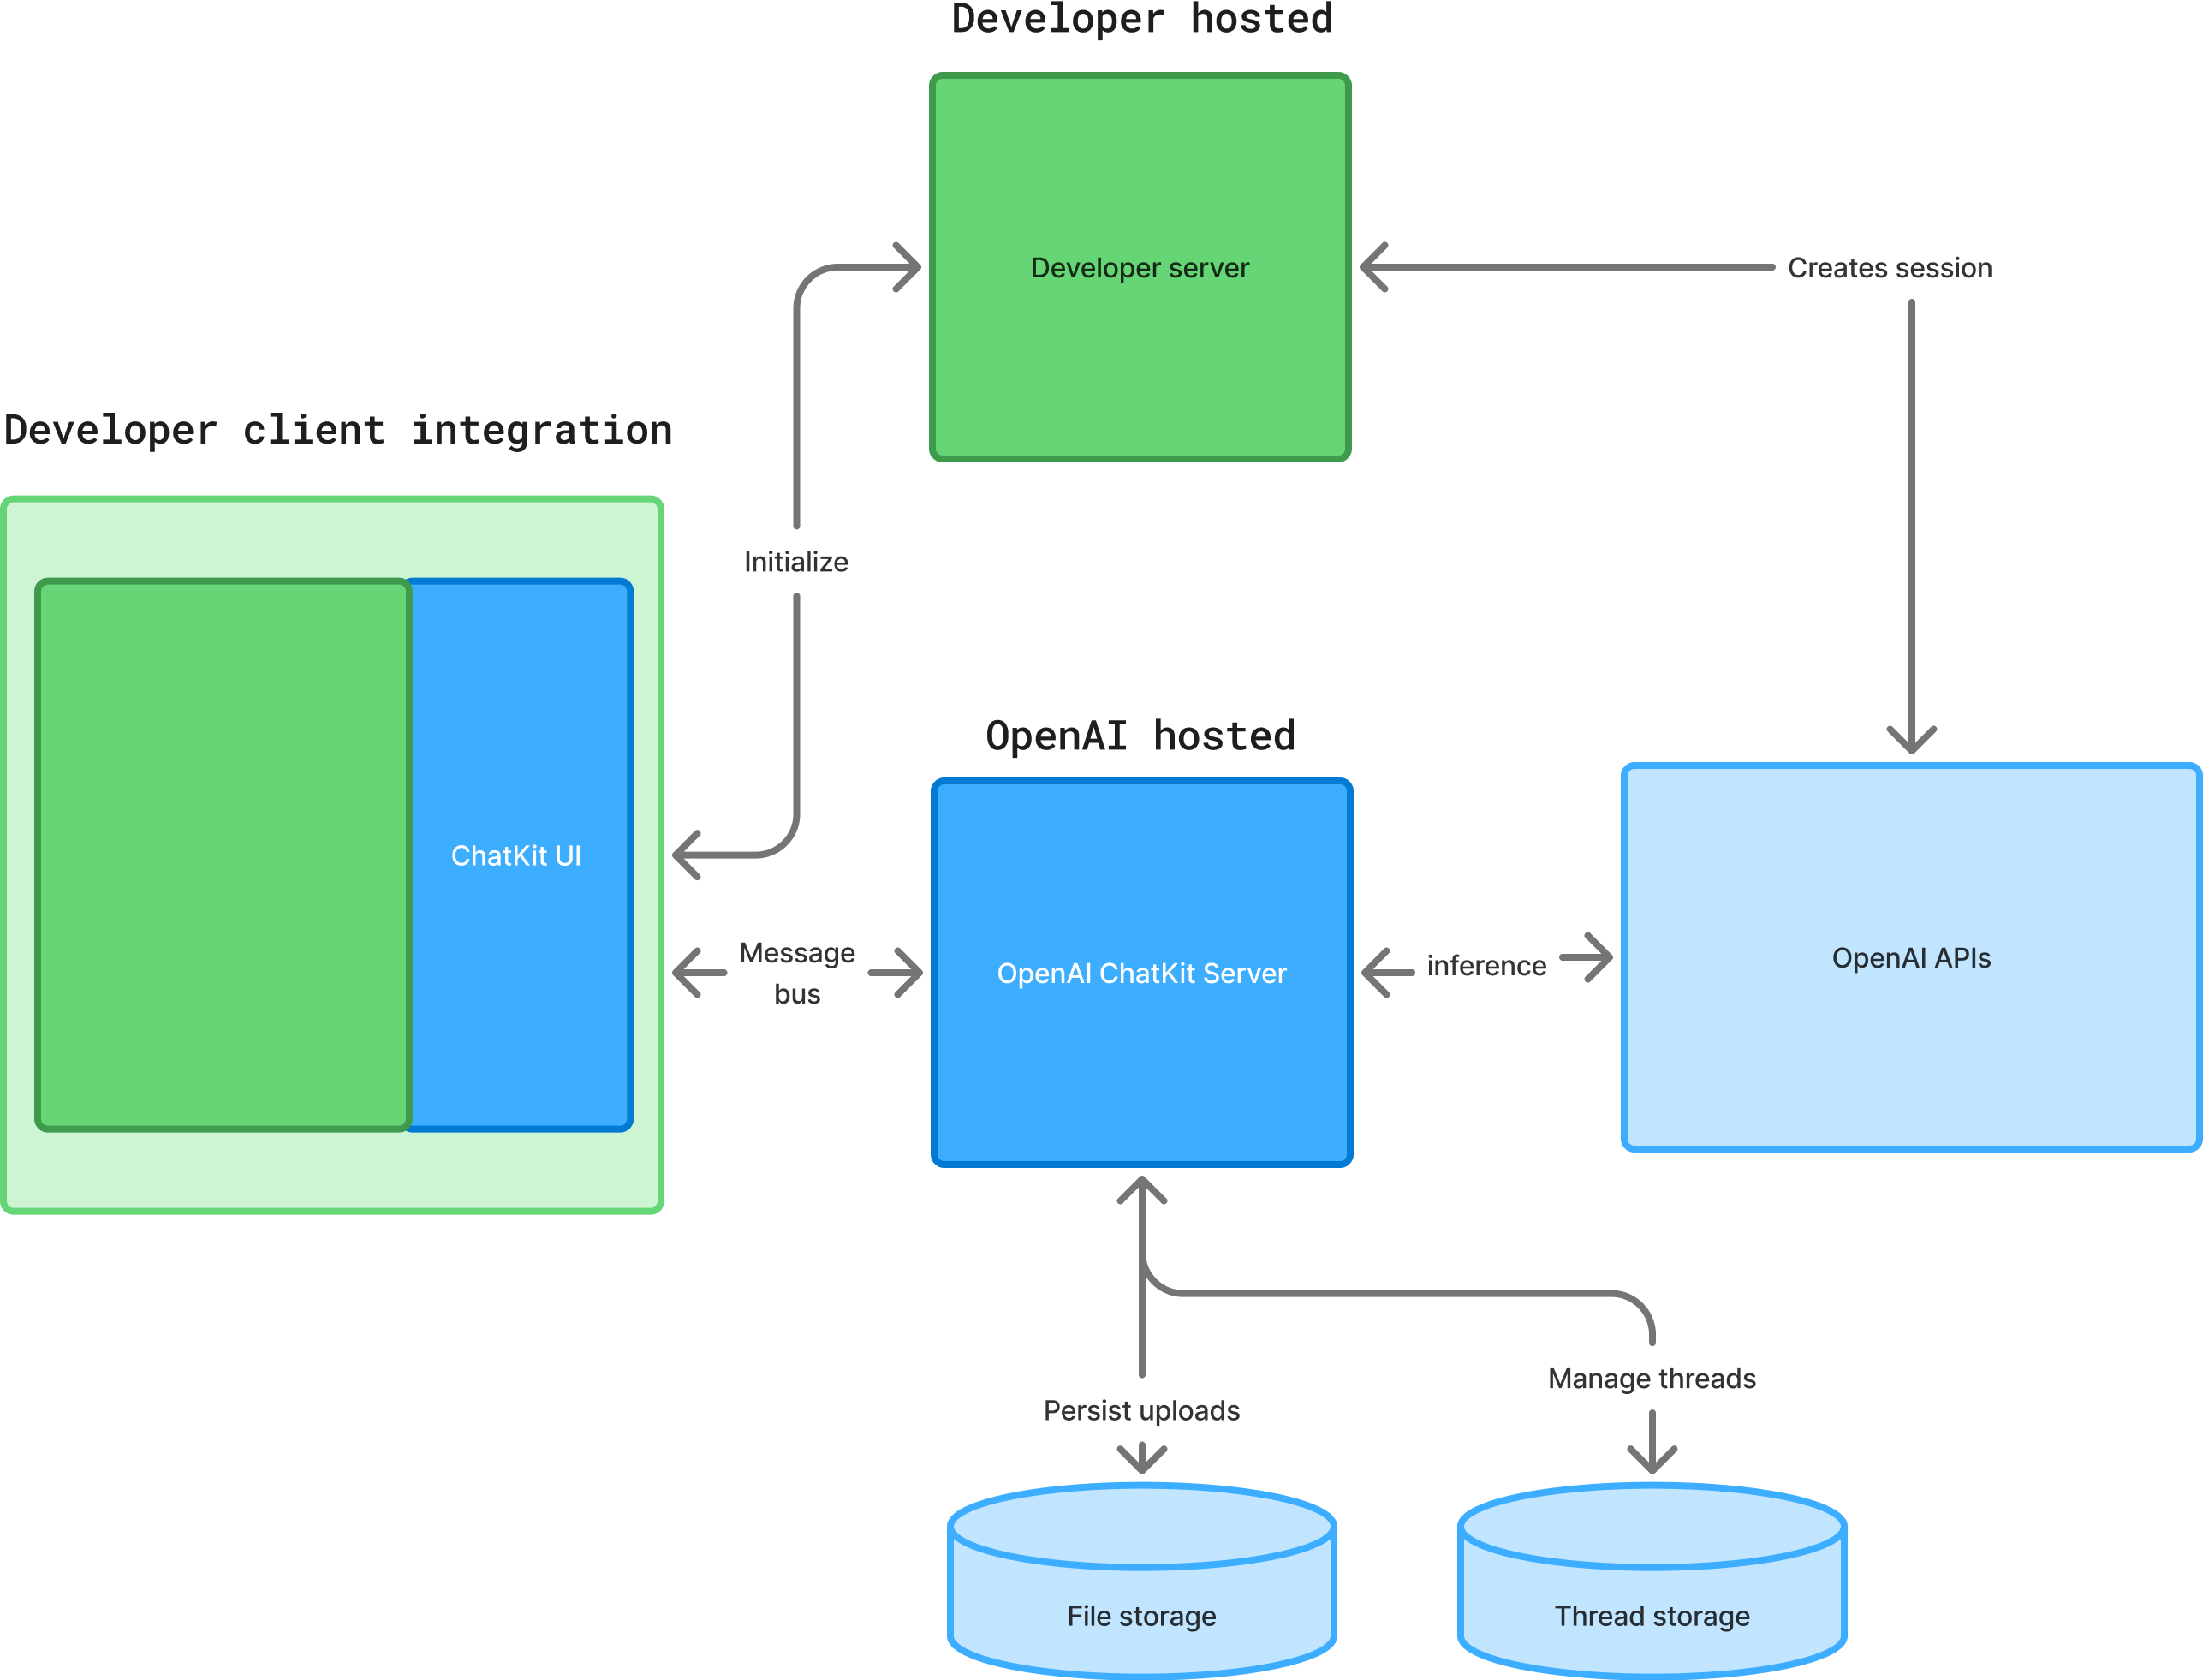
At a high level, setting up ChatKit with an existing hosted workflow is a three-step process. Open your existing workflow while Agent Builder remains available. Then set up ChatKit and add features to build your chat experience.
1. Use an existing hosted workflow
Open your existing workflow in Agent Builder. You'll get a workflow ID. For transition planning, see Migrate from Agent Builder.
The chat embedded in your frontend will point to the workflow you select.
2. Set up ChatKit in your product
To set up ChatKit, you'll create a ChatKit session and a server endpoint, pass in your workflow ID, exchange the client secret, and add a script to embed ChatKit on your site.
Important Security Note: When creating a ChatKit session, you must pass in a user parameter, which should be unique for each individual end user. Your server must
authenticate your application's users and pass a unique identifier for them in this parameter.
-
On your server, generate a client token.
This example starts a service that creates a ChatKit session through the OpenAI API and returns the session's client secret:
# Replace the illustrative IDs and URLs below with your own resource values.
import hmac
import json
import os
from typing import Annotated

import requests
from fastapi import Depends, FastAPI, HTTPException
from fastapi.security import HTTPAuthorizationCredentials, HTTPBearer
from pydantic import BaseModel


api_key = os.environ["OPENAI_API_KEY"]
workflow_id = "wf_123"
authenticated_users: dict[str, str] = json.loads(
    os.environ["CHATKIT_AUTHENTICATED_USERS"]
)
bearer_auth = HTTPBearer(auto_error=False)


def get_authenticated_user_id(
    credentials: Annotated[
        HTTPAuthorizationCredentials | None,
        Depends(bearer_auth),
    ],
) -> str:
    if credentials is not None:
        for token, user_id in authenticated_users.items():
            if hmac.compare_digest(credentials.credentials, token):
                return user_id
    raise HTTPException(status_code=401, detail="Invalid authentication token")


class ChatKitSession(BaseModel):
    client_secret: str


app = FastAPI()


@app.post("/api/chatkit/session")
def create_chatkit_session(
    user_id: Annotated[str, Depends(get_authenticated_user_id)],
):
    response = requests.post(
        "https://api.openai.com/v1/chatkit/sessions",
        headers={
            "Authorization": f"Bearer {api_key}",
            "Content-Type": "application/json",
            "OpenAI-Beta": "chatkit_beta=v1",
        },
        json={
            "workflow": {"id": workflow_id},
            "user": user_id,
        },
        timeout=30,
    )
    response.raise_for_status()
    session = ChatKitSession.model_validate(response.json())
    return {"client_secret": session.client_secret}
# Replace the illustrative IDs and URLs below with your own resource values.
require "json"
require "net/http"
require "openssl"
require "webrick"

api_key = ENV.fetch("OPENAI_API_KEY")
workflow_id = "wf_123"
# Demo authentication mapping. Replace this with your application's session authentication.
authenticated_users = JSON.parse(ENV.fetch("CHATKIT_AUTHENTICATED_USERS"))
server = WEBrick::HTTPServer.new(
  BindAddress: "127.0.0.1", Port: Integer(ENV.fetch("PORT", "8000")),
  AccessLog: [], Logger: WEBrick::Log.new($stderr, WEBrick::BasicLog::WARN)
)
server.mount_proc("/api/chatkit/session") do |request, response|
  response["Content-Type"] = "application/json"
  response["Cache-Control"] = "no-store"
  unless request.path == "/api/chatkit/session" && request.request_method == "POST"
    response.status = 405
    response.body = JSON.generate(error: "Use POST /api/chatkit/session")
    next
  end
  token = request["Authorization"].to_s.delete_prefix("Bearer ")
  user = authenticated_users.find do |credential, _id|
    request["Authorization"].to_s.start_with?("Bearer ") &&
      OpenSSL.secure_compare(credential, token)
  end
  unless user
    response.status = 401
    response.body = JSON.generate(error: "Invalid authentication token")
    next
  end
  uri = URI("https://api.openai.com/v1/chatkit/sessions")
  upstream = Net::HTTP::Post.new(uri)
  upstream["Authorization"] = "Bearer #{api_key}"
  upstream["Content-Type"] = "application/json"
  upstream["OpenAI-Beta"] = "chatkit_beta=v1"
  upstream.body = JSON.generate(workflow: { id: workflow_id }, user: user.fetch(1))
  begin
    result = Net::HTTP.start(uri.hostname, uri.port, use_ssl: true, open_timeout: 10, read_timeout: 30) do |http|
      http.request(upstream)
    end
    result.value
    secret = JSON.parse(result.body).fetch("client_secret")
    raise "Missing session secret" unless secret.is_a?(String) && !secret.empty?

    response.body = JSON.generate(client_secret: secret)
  rescue
    response.status = 502
    response.body = JSON.generate(error: "Unable to create a ChatKit session")
  end
end
trap("INT") { server.shutdown }
trap("TERM") { server.shutdown }
puts("http://127.0.0.1:#{server.config[:Port]}/api/chatkit/session")
$stdout.flush
server.start
For Ruby, install WEBrick with gem install webrick.
Before starting the service, replace wf_123 with your workflow ID and set OPENAI_API_KEY and CHATKIT_AUTHENTICATED_USERS. The latter value is a JSON map from your application's bearer tokens to stable user IDs. In production, replace this environment-backed map with your application's authentication or session lookup.
-
In your server-side code, pass in your workflow ID and secret key to the session endpoint.
The client secret is the credential that your ChatKit frontend uses to open or refresh the chat session. You don't store it; you immediately hand it off to the ChatKit client library.
See the chatkit-js repo on GitHub.
chatkit.js
export default async function getChatKitSessionToken(deviceId) {
  const apiKey = process.env.OPENAI_API_KEY;
  if (!apiKey) {
    throw new Error("OPENAI_API_KEY is required");
  }

  const response = await fetch("https://api.openai.com/v1/chatkit/sessions", {
    method: "POST",
    headers: {
      "Content-Type": "application/json",
      "OpenAI-Beta": "chatkit_beta=v1",
      Authorization: `Bearer ${apiKey}`,
    },
    body: JSON.stringify({
      workflow: { id: "wf_68df4b13b3588190a09d19288d4610ec0df388c3983f58d1" },
      user: deviceId,
    }),
  });

  if (!response.ok) {
    throw new Error(
      `Failed to create a ChatKit session: ${response.status} ${await response.text()}`
    );
  }

  const { client_secret } = await response.json();

  if (!client_secret) {
    throw new Error("ChatKit session response did not include client_secret");
  }

  return client_secret;
}
- In your project directory, install the ChatKit React bindings:
npm install @openai/chatkit-react
-
Add the ChatKit JS script to your page. Drop this snippet into your page’s
<head>or wherever you load scripts, and the browser will fetch and run ChatKit for you.index.html
-
Render ChatKit in your UI. Pass the React
MyChatcomponent agetAppAuthTokenfunction that returns the current user's bearer token. If you use the JavaScript tab, make the same function available in the snippet's scope. This code sends that credential to your server, fetches the client secret, and mounts a live chat widget connected to your workflow.Your frontend code
const chatkit = document.getElementById("my-chat");
if (
  !chatkit ||
  !("setOptions" in chatkit) ||
  typeof chatkit.setOptions !== "function"
) {
  throw new Error("ChatKit element not found.");
}

chatkit.setOptions({
  api: {
    async getClientSecret() {
      const appAuthToken = await getAppAuthToken();
      const res = await fetch("/api/chatkit/session", {
        method: "POST",
        headers: {
          Authorization: `Bearer ${appAuthToken}`,
          "Content-Type": "application/json",
        },
      });
      if (!res.ok) {
        throw new Error(`ChatKit session request failed: ${res.status}`);
      }
      const { client_secret } = await res.json();
      return client_secret;
    },
  },
});
import { ChatKit, useChatKit } from '@openai/chatkit-react';

   export function MyChat({ getAppAuthToken }) {
     const { control } = useChatKit({
       api: {
         async getClientSecret(existing) {
           if (existing) {
             // implement session refresh
            }

           const appAuthToken = await getAppAuthToken();
           const res = await fetch('/api/chatkit/session', {
             method: 'POST',
             headers: {
               'Authorization': 'Bearer ' + appAuthToken,
               'Content-Type': 'application/json',
             },
           });
           const { client_secret } = await res.json();
           return client_secret;
         },
       },
     });

     return ;
   }
3. Build and iterate
See the custom theming, widgets, and actions docs to learn more about how ChatKit works. Or explore the following resources to test your chat, iterate on prompts, and add widgets and tools.
Build your implementation
[ChatKit docs on GitHub
Learn to handle authentication, add theming and customization, and more.](https://openai.github.io/chatkit-python)
[ChatKit Python SDK
  Add server-side storage, access control, tools, and other backend
functionality.](https://github.com/openai/chatkit-python)
[ChatKit JS SDK
Check out the ChatKit JS repo.](https://github.com/openai/chatkit-js)
Explore ChatKit UI
[chatkit.world
Play with an interactive demo of ChatKit.](https://chatkit.world)
[Widget builder
Browse available widgets.](https://widgets.chatkit.studio)
[ChatKit playground
Play with an interactive demo to learn by doing.](https://chatkit.studio/playground)
See working examples
[Samples on GitHub
See working examples of ChatKit and get inspired.](https://github.com/openai/openai-chatkit-advanced-samples)
[Starter app repo
Clone a repo to start with a fully working template.](https://github.com/openai/openai-chatkit-starter-app)
Next steps
When you're happy with your ChatKit implementation, learn how to optimize it with evals. For new ChatKit apps, or to move an existing ChatKit app off an Agent Builder-hosted workflow, see the advanced integration docs.